and can add extra seating when needed.
 |
| Slip covered ottoman features 100,000 double rub velvet on the top and my custom made stripe of velvet and 3 colors of silk on the sides. |
They are more likely to get soiled by their very nature. Cleaning would be easier if the cover could be removed and taken to a dry cleaner. Now all my ottomans are slip covered.
 |
| Lumber is cut to build the frame. |
Once you determine the dimensions of the ottoman, it is necessary to cut the lumber to size.
Don't forget to deduct the thickness of the foam that will go on top of the frame. For example if the ottoman is to be 21" high, it will probably have a top of 6" thick medium density foam. Your wood frame will be 21"-6"foam=15" tall. If you are using what is called 1" lumber for the frame(1" lumber is actually 3/4" thick), You will cut the cross pieces 1 1/2" shorter than the finished width
to allow for the thickness of the front and back board.
 |
| Pre drill all screw holes to prevent splitting |
Always use hardwood for your framing lumber.
Oak and poplar are readily available at home improvement stores. While oak is probably stronger, I prefer to work with poplar. It is less expensive and not as heavy.
For legs, I use 1 1/2" x 1 1/2" clear pine.
If your ottoman is to only be 2 1/2 feet to 3 feet long four legs should be fine. Longer would probably require a set in the center. I always incorporate the leg pieces into the frame.
 |
| End piece ready to be screwed |
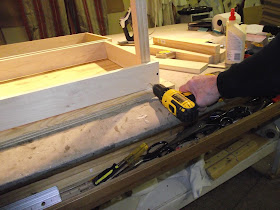
To start I pre drill one in each front and back board. While these first screws provide almost no strength they hold the frame pieces in place until the leg can be added. Placing the end board between the front and back board, Screw through the front board and into the end of the side pieces.
Working on a stable flat surface makes it easier to get the frame pieces properly aligned.
 |
| End piece being screwed to front piece. |
I use 1 1/2" flat phillips head screws.
 |
| Leg pieces are added. |
Once the two rectangular frame pieces are screwed together, it is time to add the leg pieces. The leg pieces eliminate the need for corner bracing. Drill two holes in the front frame board and two holes in the end board. Be careful to align them to hit the leg piece, but also for the screws to not hit each other. After the holes are drilled use a good quality wood glue where the pieces will be joined. Hold the leg piece flush with the top and tight against the side pieces and screw into place. If a gap develops as you screw into the side pieces, back the screw out and hold the leg closer to the frame piece.
 |
| Legs are marked to receive the bottom frame piece. |
If the legs are not pulled tight against both front and end frame pieces, the glue will not hold them tightly and the joint will not be strong.
Once the corner leg pieces are attached, determine where the second frame piece will be attached and measure and mark. This will be the bottom edge of the ottoman.
 |
| With the exception of two more cross braces not shown on the top, the frame is complete. |
Repeat the process on the bottom part of the frame. At this point any additional legs needed are glued and screwed into position. This 5' ottoman required a set of legs in the center and a cross brace. Two cross braces (not shown) were added in addition to the center one, dividing the top "squares" in half again. This was done to keep the top frame from pulling in when the webbing is added.
 |
| Webbing is begun |
Now that the wooden frame is constructed it is time to add the jute webbing. I use an electric stapler with 3/8" staples. Even with the electric stapler I usually hammer the staples in tight. If you are using a regular staple gun, you will almost certainly have to hammer the staples in after using the gun. Both sides and tops need to be webbed. The fastest way to web this kind of frame is to start at the bottom, put in several staples, hammer them without cutting the webbing go to the outside edge of the top frame. Stretch the webbing tight. There is a special tool for doing this. It has a bent handle and sharp teeth that punch into the webbing and allow you to wedge against the frame to pull the webbing tight. While the tool is great, before I got one I used a regular pair of pliers. When the side is pulled tight, put several staples through the webbing. Now pull the webbing across the top of the frame, stretch and staple tight; then pull the webbing to the bottom of the other side of the frame and stretch and staple tight again.
 |
| Webbing attached up side,across the top and down other side. |
By attaching the webbing securely at each point and using one continuous piece you save time and webbing.
 |
| Webbing is attached in the opposite direction |
Now starting at the end, repeat the process in the opposite direction. Weave the webbing in and out across the top as shown. Don't forget to secure it on the top edge going this direction as well.
 |
| Electric carving knife is used to cut 6" medium density foam |
After the frame is fully webbed, measure and mark the foam for the top. Cut the foam about 1" longer and 1" wider than the actual frame.
 |
| Staple the foam bottom edge about every 10" to the top edge of the frame |
Using the measurements of the frame and the foam I make a cover out of heavy flannel inner lining.
It is pulled over the frame and stapled to the bottom part of the frame.

 |
| Looking inside the frame after foam and first flannel cover is attached. |
 |
| Polyester furniture batting is added |
 |
| Batting is added to sides |
Polyester furniture batting is added over the first flannel covering. Once again to economize on batting, it was attached to the bottom of the frame at one end pulled across the top and attached at the bottom of the frame on the other end. The sides were then filled in and stapled in place on the frame.
 |
| A line is established where the foam stops and the frame begins. |
Next turn the ottoman on its side and staple the "hook" velcro on the bottom of the bottom frame board all the way around the ottoman.
Now it is time to make the slip cover!!
 |
| Top part of cover is checked for fit. |
With this ottoman my plan was to cover the foam part with a hard wearing velvet and skirt the balance to the floor. In cases where you only want an 8 or 10 inch skirt at the bottom, you have to use a wider board for the bottom frame so you have a place to staple where the top of your skirt will be.
 |
| Checking top of slip cover for fit |
 |
| Seam is pressed open on skirt and lining |
Skirt is to be 1/2" off floor -1/2"= 21"
Add 1/2" seam allowance top and bottom + 1" + 22"
Add 2" for "pull up" +2" = 24" cut length
To determine the lengths of lining to cut:
Top of "pillow" velcro to floor 21 1/2"
Skirt is to be 1/2" off floor- 1/2" = 21"
Add 1/2" seam allowance top and bottom + 1 = 22"
Subtract 2" for "pull up" - 2" = 20" cut length
Match seams and sew skirt pieces together. Press open seams. Place the bottom of the skirt fabric on top of the bottom of lining fabric (face to face) sew together with a 1'2" seam. Press open bottom seam. Fold back to back with top edges together and press bottom. Overlock or ziz zag top edges together.
 |
| Skirt is sewn, turned with "pull up hem |
 Next the skirt is pleated. The right side of the
picture shows the gold stripe inside the pleats,
The left side shows that the gold stripe has not yet been pleated in.
After pleats are pressed and pinned into place, it may be easier to sew them into place stitching about 1/4" in from the edge. Place the "pillow top cover" face up and the pleated skirt face down on top of the "pillow top cover". Determine where you want pleats to be. Line up the edge of the velcroed "pillow top cover" with the edge of the skirt. Spot pin . Put the skirt part down so that the back of the "pillow top cover" is up. Watching the seam that attached the welt cord, sew both pieces together. Sew in a little tighter than the seam you are watching to be sure no seam will show when turned.

Next Measure again from the top of the "pillow top velcro to the bottom edge of the frame. Add to that 1"( 1/2" seam allowance for the top and 1/2" turn under for the bottom edge). Cut this fabric the proper lengths. Cut the widths 1" longer and wider than the front-back measurements and the end measurements. Seam the four pieces together. Being careful to align the corners with the corners of the "pillow " top of the cover pin the face of the new fabric to the back of the skirt fabric. Align tops and once again placing the fabric on the sewing machine
so that you are watching the back of the "pillow" top welt cord sew the pieces together. Once again sew on top of the welt cord seam so that no seams show when the skirt is put down.
Next overlock or zig-zag the bottom wedge of the ottoman cover fabric. Now sew the loop (or fuzzy) velcro on the back of the bottom edge of the ottoman cover. Turn the entire cover.
First pull the "pillow top" part of the cover into position. Align the corners and pull the cover down and align and press the velcro together. When the "pillow top" is securely in place, pull the lower "ottoman cover" part over the body of the ottoman. Align corners and turn the edge under so that the velcro attaches to the "hook " velcro attached to the boddtom edge. Pull the skirt down into place.
DONE! Enjoy your new ottoman
INTERIOR DECORATOR INTERIOR DESIGNER


No comments:
Post a Comment